
The System Matters More Than the Distance
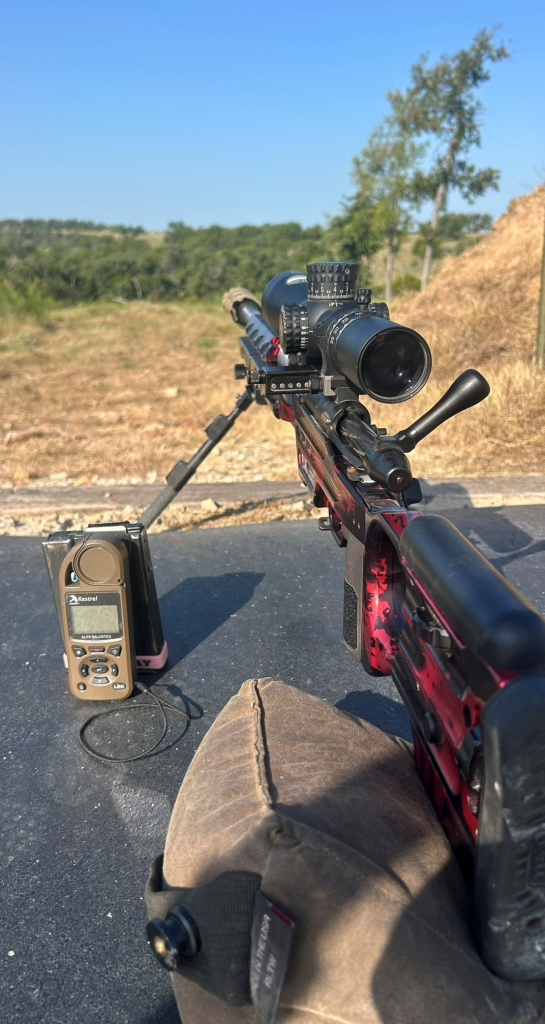
I have taught quite a few people how to shoot long-range over the years, and most of the time, each class starts in almost exactly the same place. We are standing at a range with a rifle, a scope, a set of rings, and usually a rifle that has either never been set up correctly or has been assembled by somebody else without the shooter really understanding what was done. Before we ever think about shooting 600, 900, or 1,000 yards, we take the entire system back to the beginning. I do that for a reason.
Long-range shooting tends to look complicated from the outside. Ballistic solvers, chronographs, weather meters, ballistic coefficients, density altitude, wind calls, reticles, scope adjustments, and a whole collection of terminology can make someone believe they need to understand everything before they can begin. I don’t think that’s true. What they need is a foundation. Once they understand how the pieces work together, everything else becomes refinement.
That is really the point of this article. This isn’t an attempt to teach every part of long-range shooting. It won’t make somebody an expert wind caller or a great positional shooter. What I want to do is build the basic system from the ground up in the same order I normally teach it. If you learn this part cold, you can take that understanding almost anywhere. Different rifles, cartridges, bullets, weather, and distances may change the numbers, but they don’t fundamentally change the process.
As experience grows, your limits should expand naturally.
Start With the Rifle and Scope
Okay, let’s begin with a bare rifle and an optic that hasn’t been mounted, along with a quality mounting system. Let’s walk through the system step by step.
First, we should talk about torque specs. A properly torqued fastener is not simply “tight.” Applying torque creates preload by elastically stretching the fastener slightly, generating the clamping force that holds the joint together. Manufacturers provide torque specifications for their equipment, and you should check them before assembly to make sure you’re applying the appropriate clamping force. Too little clamping force can allow movement. Too much can damage the parts being clamped. This is why I pay attention to the manufacturer’s torque specifications rather than simply tightening screws until they feel good.
All of this becomes particularly important with scopes. Different scope tubes and different ring designs tolerate different amounts of clamping force. Some scope tubes will begin to deform under relatively modest ring-cap torque. I have personally watched rings become tight enough around a scope tube that internal systems like the power selector or parallax adjustment no longer operate correctly. On the other side of that, a stronger tube still isn’t immune to being crushed if somebody gets carried away with a wrench and ignores torque specs.
The point isn’t to memorize one torque specification for every product. The point is to understand why the specification exists and use the correct one for the equipment in front of you.
Now we also need to level the rifle. To do this, I put a level on the Picatinny rail before the scope goes into the rings. After the scope is in the rings, but before the ring caps are tightened to spec, I put a second level on top of the elevation turret and rotate the scope until both levels show plumb. This aligns the optic’s vertical axis with the rifle’s vertical plane.
If the scope’s elevation axis is tilted relative to the rifle, dialing elevation no longer moves the reticle purely vertically relative to the bore. Part of that adjustment becomes a horizontal component. At short distances, a small alignment error may not be very noticeable. At longer ranges, the angular divergence becomes increasingly important. I generally want the system aligned within about a degree or better because there is simply no reason to deliberately carry an avoidable error into a long-range rifle.
This tilt error can also make it appear that your ballistic solver is giving you the wrong solution, when the real problem is that part of the elevation you dialed has become a horizontal correction. Wind calls can also start to make less sense because you’ve introduced a horizontal component when dialing elevation. The simple answer is to make sure the rifle and scope are level with each other from the beginning.
We should probably quickly touch on what type of optic you are using. Honestly, almost any appropriate optic can be used here—first or second focal plane, MOA or mil—but as with almost every part of a system, each choice comes with benefits and compromises.
For long-range shooting, I strongly prefer first focal plane because the reticle subtensions remain correct at every magnification. That becomes important as we start using the reticle to measure misses, hold for wind, and communicate corrections. Second-focal-plane scopes can certainly be used, but their reticles only subtend correctly at a specified magnification, which adds another variable I would rather eliminate from the system. I explain the differences in much greater detail in [First Focal Plane vs. Second Focal Plane Scopes].
Parallax fits naturally into the same discussion. The phrase to remember is simple: parallax is eliminated when the target image is focused on the same optical plane as the reticle. I normally demonstrate this concept with two thumbs. Start by holding one thumb out in front of you and another closer to your face. Keep both thumbs physically still and move your head from side to side. The front thumb seems to stay in place, just like the image of the target does inside the scope, while the rear thumb appears to be moving. The rear thumb is acting like the reticle. Nothing is actually moving except your viewpoint, but because the two are on different planes, you see apparent movement between them. That is parallax.
Now bring the two thumbs together so they are resting on top of each other and move your head again. The apparent movement disappears. That is what we are trying to accomplish when we adjust parallax in the scope: we bring the target image onto the same optical plane as the reticle, so movement of the shooter’s eye no longer makes the reticle appear to move across the target.
Build a Zero You Can Trust
Once the optic is mounted correctly, it’s time to zero the rifle.
Before firing a shot, I normally bore sight the rifle by looking directly through the barrel. I remove the bolt, stabilize the rifle on a bipod and rear bag, and center a visible point on the 100-yard target through the bore. Then I move behind the scope and adjust the reticle until it is looking at that same point. I don’t do this once and assume it is good. I go back and forth between the bore and the scope repeatedly. If I take my time and do my job correctly, my experience is that the first live round will usually land within a few inches of where I want it at 100 yards.
That first bullet gives us another important lesson: find your own impact through the scope. Then we can introduce one of the most important concepts in long-range shooting:
The reticle is a ruler.
If the optic is in mils, you should speak mils. If it is in MOA, speak MOA. We need to stop the habit of converting everything into inches, or any other measurement unit, as early as possible. If an impact is six-tenths low and three-tenths right, that is the information we need. Converting that into inches and then converting those inches back into scope adjustments adds unnecessary steps, because the reticle measures the correction in exactly the same language the turrets use.
It’s easy to struggle with this concept initially. Let’s look at a reticle to understand it visually. Using this Nightforce MIL-C reticle image, you can see the marks on both the horizontal and vertical portions of the reticle are spaced in two-tenths-of-a-mil increments. When using this in an optic, you simply measure the distance from where the bullet impacted the target to the point you aimed at using those subtended marks on the reticle, and that’s your measurement. That’s just like looking at a ruler and saying the distance between two marks is a quarter of an inch. Both are actual measurements. Once you understand what the measurement is, it’s easy to adjust the optic because the reticle and the turret adjustments use the same language.
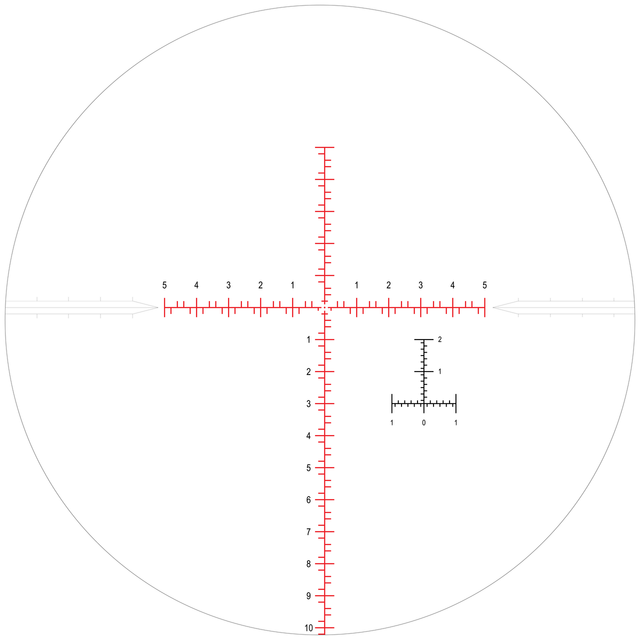
After the first shot, use the method above to measure where the bullet impacted the target and use those measurements to make the initial adjustment to your optic. If you measure the impact 1.2 mils high and .8 mil to the right, you simply dial those adjustments into your turrets. The elevation turret would be dialed DOWN 1.2 mils, which is 12 clicks, but it will also be visibly marked on the turret so you don’t need to count. Then adjust the windage turret .8 mil to the left. Both turrets will be marked to show which direction to turn them to move the impact up or down and left or right.
Once you’ve made your initial adjustment to the optic, I like to shoot a 10-shot group. The reason I start with 10 shots is that I need to understand the cone of fire for this new system. As much as we’d all like to think our rifles are incredibly accurate and deliver each impact to a precise point with every shot, the reality is there is a cone of fire. This is the natural dispersion of the system, or simply the size of the group the rifle will regularly shoot with the ammo we’re feeding it. When we fire 10 shots, we’re getting a much better sense of what that cone of fire looks like, and then we make our zero adjustment from the center of that cone.
After making that adjustment, shoot another group. An adjustment is not confirmation. The group after the adjustment is what verifies that the center of our cone of fire is actually centered on our aiming point. That allows us to have confidence in this part of the system before we begin moving out to longer ranges.
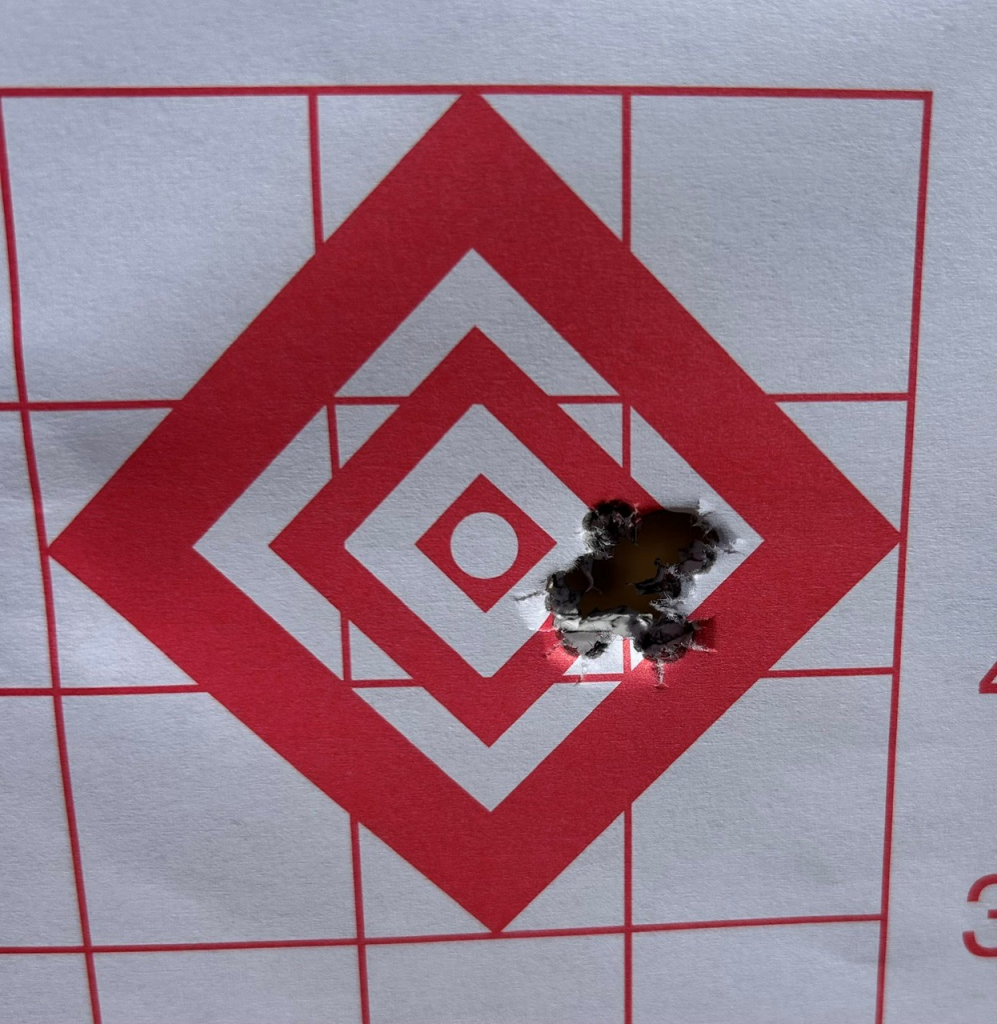
Our zero should be as precise as we can reasonably make it. Even a small error like .1 mil matters. A .1-mil zero error at 100 yards is still a .1-mil error at 1,000 yards. If we don’t know our zero is off, we can see that error downrange and mistakenly start changing something else in our ballistic system to correct it. Starting with a solid zero removes one more source of uncertainty when something doesn’t make sense later.
There is also a difference between establishing a zero and trusting a zero. In my own shooting, I don’t truly trust a zero until I’ve got 30–50 rounds fired at my zero range. No, I don’t do that all at once. I check it every time I come to the range to shoot at distance. It’s how I begin every single shooting session. I start to really trust my zero when I’ve made several trips to the range and it stays pretty stable. If you learn to be religious about your zero technique, you can eliminate a bunch of uncertainty later when portions of your long-range firing solution don’t make sense.
A zero starts as an observation. Confidence comes from seeing it repeat.
Measure What the Rifle Is Actually Doing
While zeroing your system, you should be capturing your chronograph data. I use a Garmin Xero, but there are other chronographs that can give you velocities you can be confident in. The point is, it’s hard to shoot at distance without having a velocity average for the system you’re shooting. If you start taking velocities as you zero, you should have a solid average with 15–20 shots at a minimum over the chronograph. Having that many shots gives us a meaningful average to use when we start building the ballistic profile.
The next step is to open a ballistic solver. I currently use Applied Ballistics Quantum, QuickDope, and a Kestrel. In the past I often used Shooter and Hornady 4DOF, and I’m sure there are other good options I’m not mentioning. Honestly, the specific app is less important than understanding the information we are feeding into it.
To build the profile, the solver is going to need some basic information about the rifle and ammunition. We already have our muzzle velocity. We also need to tell it which bullet we’re using, the caliber, height over bore, and twist rate. You’ll also need to tell the solver whether your optic uses MOA or mil adjustments. Some of this information may be populated automatically when you select a bullet from the app’s bullet library.
One of the pieces of information associated with that bullet is its ballistic coefficient, or BC. A ballistic coefficient is simply a way of describing how well a bullet retains velocity as it travels through the air. A higher BC bullet generally loses velocity more slowly than a lower BC bullet. The ballistic solver uses that number, along with your muzzle velocity and atmospheric conditions, to predict how quickly the bullet will slow down and therefore how much it will drop over a given distance.
You will normally see ballistic coefficients expressed as either G1 or G7. Those numbers are based on two different reference projectile shapes used to model drag. For the long, streamlined bullets normally used for long-range shooting, I prefer G7. You may also encounter Custom Drag Models, or CDMs, which use measured drag data for a specific bullet rather than comparing it to a standard reference projectile. We don’t need to go much deeper than that right now.
Not all published BCs are created equal. Historically, many manufacturer BCs were developed over relatively short test distances, often only a few hundred yards. That can provide a useful number, but it may not describe the bullet’s drag as accurately over the much longer distances we’re interested in. Modern Doppler-radar testing provides a much better picture of how the bullet actually slows throughout its flight. When possible, I prefer BC data that has either been independently measured over meaningful distances or developed using Doppler radar. This is one reason I often start with the Applied Ballistics bullet library, where many of the BCs have been independently measured by Bryan Litz.
With our velocity and bullet information entered, let’s add the height over bore. This is simply the distance between the centerline of the bore and the centerline of the optic. This is another piece of information we can measure, so there is no reason to estimate it and deliberately introduce another potential error into our ballistic profile. I normally use a set of calipers and measure from the gas port to the split in the rings. Both the split in the rings and the gas port of the rifle are roughly centered on the scope and bore respectively. In my experience, this method gets the measurement within a few thousandths of an inch, which is far more precision than we need for this input.
Understand the Air Without Getting Lost in It
Now we need to talk about the environmental effects of shooting long range. We’re going to borrow the basic concept from aviation because it’s a very elegant way to discuss one of the main environmental effects on a bullet. An airplane cares how thick or thin the air is because that affects how its wings create lift. A bullet also cares how thick or thin the air is because air density affects drag.
Elevation, temperature, humidity, and barometric pressure all help describe the atmospheric conditions that determine how dense the air is. We can represent that air density with a single number called density altitude. DA, the acronym commonly used for density altitude, gives us one convenient number that represents that air-density environment. This allows us to tell our ballistic solver how thick the air is where we’re going to be shooting.
You can get this information several ways. Some solvers won’t even present a DA number and instead work directly from elevation, temperature, barometric pressure, and humidity. For what we’re trying to understand right now, know that they are accomplishing essentially the same thing: giving the solver the atmospheric information it needs to account for the density of the air the bullet is flying through.
If you have access to a Kestrel, it is an actual weather meter, which is great because it gives you the atmospheric conditions where you’re standing. If you’re just working from an app on your phone, though, you’re not out of luck. You can pull the conditions from a nearby weather station. When teaching long-range classes, I’ve often compared the DA from a nearby weather station with the DA from my Kestrel, and they’re usually within a couple hundred feet of each other. It normally takes well over 1,000 feet of DA change before you’re going to see a meaningful difference in the solver’s solution at the distances we’re working with.
The First Test: 600 Yards
Once the ballistic profile is built, and you’ve updated the environment in the ballistic solver, it is time to see whether the prediction matches reality.
I normally start at 600 yards. This is really just a gut check to make sure everything is working and our solution is reasonably close, but you could start closer if you desired. If you’ve never tried long-range shooting, I might opt for working the yardages out instead of jumping straight to 600.
If you’re shooting a mil-based system, 600 should be somewhere in the ballpark of 4 mils of elevation on your scope. Really fast cartridges might be 3.4 mils or less, and a really slow cartridge might be 4.6 mils or more, but something like a 6.5 Creedmoor shooting a 140-grain-class projectile at 2,700–2,800 fps would be right around 4.0 mils.
For more background on the 6.5 Creedmoor, see Why I Keep Coming Back to the 6.5 Creedmoor
The real goal of the above paragraph is to make sure you don’t have an error somewhere and end up launching a bullet over a berm. If you’re somewhere in the range of what I explained above, you’re not seeing a crazy error.
This is also the point where you need to start taking wind into account. At 600 yards, wind will be a factor, and it’s pretty uncommon to be able to aim right at the target at 600 yards and hit center, so now is the time to start accounting for wind. I’m assuming most people won’t have a wind meter, so you’re going to have to wing this one a little. The bad part is, most people are horrible judges of wind speed. I’ve never met anyone who’s super consistent to within a couple miles an hour, so it’s a bit tough without a meter.
For more on how to develop a wind call, see Reading Wind for Long-Range Shooting: Building a Wind Call You Can Trust
The closest weather station can at least get you in the ballpark. Look and see what the weather station says for the current wind conditions, and then feel what the wind is doing at your location. Oftentimes, weather stations are on a tall tower, so they can have higher winds than you might be experiencing at your location. Sometimes subtracting 4–5 mph from that weather station can get you in the ballpark.
Now put the wind speed you think it might be blowing, and then put the direction it’s blowing from into the solver as well. This will give you an initial wind call for the 600-yard shot. I might try a range of wind speeds at the direction you’re seeing the wind come from and see how far they actually vary. Are you seeing a mil change with those different speeds, or is it just a couple of tenths? Pick the one you think is closest, and you’re ready to send your first shot.
When you send this first shot, try to be really square behind the rifle so you can see your impact or your miss. This is a very important concept in long-range shooting because being able to spot and correct your own shots is a vital skill.
When you make that first shot, hopefully you’re on steel. If you are, we’re going to go back to using the reticle as a ruler and measure how far from center you are, both vertically and horizontally, but I’m mostly interested in getting horizontally centered on the plate first. The reason is, we’re going to shoot a group on this plate now and see how the elevation is trending and if our solver is giving us good dope. If we’re not centered right to left, we could have a wind gust blow us off the plate while we’re shooting a group. Get reasonably centered horizontally, and then shoot a five-shot group.
Before we look at that group, we need to introduce another term I use constantly when shooting at distance: waterline.
Imagine drawing a perfectly horizontal line through the center of the target. That is our waterline. If the elevation portion of our ballistic solution is correct, the center of our group should fall somewhere along that horizontal line. The wind may move the group left or right, but for the moment we’re interested in whether the group is centered vertically on that line.
This distinction is important because wind and elevation are telling us different things. If the group is centered vertically but sitting six-tenths left of center, I don’t immediately have a reason to question the elevation solution from my ballistic solver. I probably have a wind problem. If the center of the group is three-tenths above the waterline, though, now I have evidence that the elevation solution may not agree with what the rifle is actually doing.
This is why I care so much about waterline when validating a ballistic profile. We are trying to separate vertical information from horizontal information instead of treating every miss as one problem.
Once you have five shots on the plate, use the same cone-of-fire concept from zeroing. Look at the center of the group and compare it to the waterline. At this point, we’re simply checking whether the elevation predicted by our ballistic solver agrees reasonably well with reality. I’m usually hoping the center of the group is within about .1 mil of waterline.
True the Model Farther Out
We’re ready to attempt to true our BC. The best way to accomplish this is to shoot a target at the farthest distance you have access to while the bullet is still comfortably above its transonic flight range.
Before we do that, we need to briefly understand what supersonic and transonic flight mean. The speed of sound changes with atmospheric conditions, but it’s roughly 1,100 fps. When a bullet is traveling faster than the speed of sound, it is supersonic. As it slows and begins approaching the speed of sound, it eventually enters what we call the transonic region.
That transition matters because the airflow around the bullet begins changing as it approaches the speed of sound, and its drag behavior becomes more complicated. We don’t need to understand all of the aerodynamics involved right now. We just don’t want to introduce those additional variables while we’re trying to determine whether our BC accurately predicts what the bullet is doing.
For our purposes, I want the bullet traveling around 1,400 fps or faster at the distance where we’re going to true the BC. That keeps us comfortably above the transonic region and gives us a relatively clean place to compare the solver’s prediction with what the bullet is actually doing.
Your ballistic solver already predicts the bullet’s velocity at every distance, so this is easy to check. Look at the predicted velocity at the target you want to use. If it is still above roughly 1,400 fps, we’re in a good place to do this work. If it has fallen below that, pick a target closer to you.
Ideally, I would do this as far away as practical while keeping the bullet comfortably above the transonic region. The farther the bullet travels, the more opportunity differences between the BC in our solver and the bullet’s actual drag behavior have to become visible.
There is a practical limit, though. At very long distances, it becomes increasingly difficult to reliably see impacts and determine where the center of a group actually is. A longer distance doesn’t help us if we become less certain about what we’re seeing. Having a partner spotting through a good optic can make those longer distances much more useful.
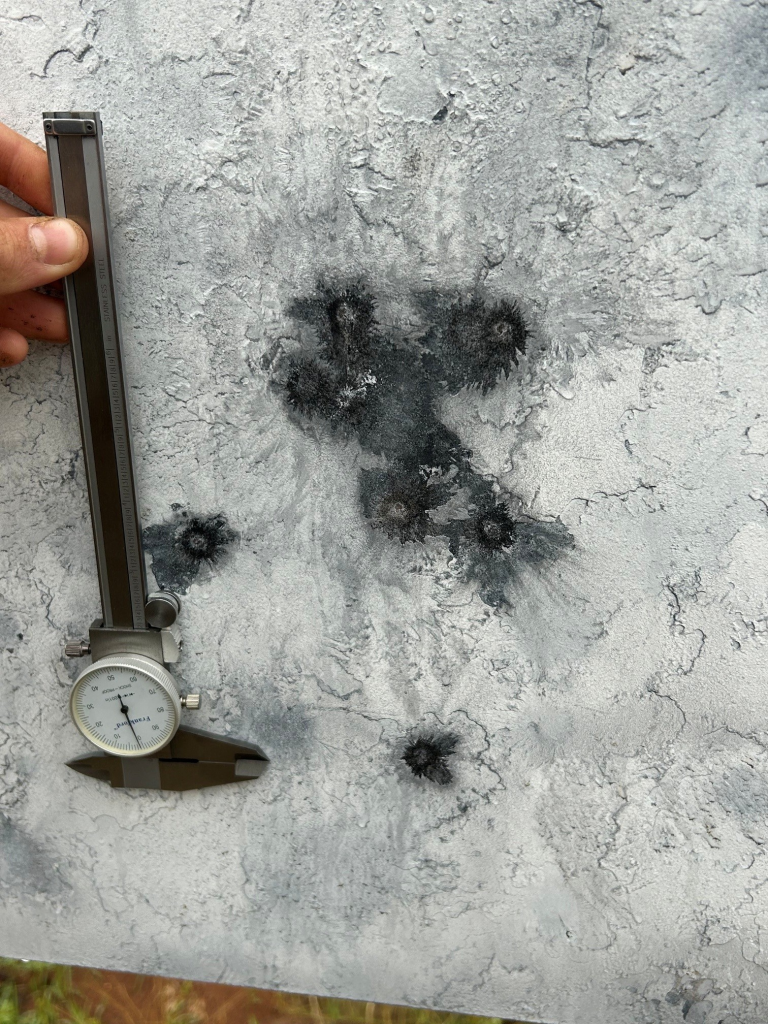
In practice, I often true at around 900 yards because that works well at the range where I normally teach and shoot. It is far enough to give me useful information, while still being close enough that I can normally see what the rifle is doing. The BC values I’ve established at that distance have continued to produce firing solutions that agree well at longer ranges.
I would be cautious about going much closer than 900 yards, though. I have tried truing BCs at 600 yards and found that the resulting longer-range solutions could be pretty poor, sometimes enough to put shots completely off the target at 900–1,200 yards. At shorter distances, the difference we’re trying to measure simply hasn’t had as much time to develop, so small errors in what we’re seeing can have a larger effect on the BC value we end up with.
This is one of those places where you have to understand the compromise. Farther gives us more information about how well the BC is modeling the bullet, but only if we can reliably see and measure what is happening at the target. For me, 900 yards has proven to be a useful practical minimum, while farther is preferable when the range and conditions allow it.
Okay, if we have a distance picked out, we need to shoot a group. Again, work through developing a good wind solution and then start shooting. We need a minimum of five shots for this, and more will not hurt you. It’s just like establishing a zero. The more confidence we have that we’re seeing the overall cone of fire of our system, the more meaningful our adjustment will be.
Once we have a good group on the longer-distance target, determine where the center of the group is and use the reticle to measure how far it is from waterline. Hopefully, you should be very close. If we’re way off at this point, I’m going to suspect another error somewhere in the system. Something much more than a couple of tenths makes me start looking for another input in our ballistic profile that may be wrong.
Before changing the BC, though, I want to slow this process down. This is one of the easiest places for a new shooter to introduce error into a ballistic profile. Just because our group is two-tenths above waterline does not automatically mean the BC is wrong.
Before I change anything, I want to make sure the rest of the system still agrees with what I think I know. I will often go back and check my zero again. I also keep the chronograph running throughout this entire process, so I know whether the muzzle velocity I’m using in the solver still represents what the rifle is actually doing. I want a good group and enough shots to have confidence in where the center of that group really is, and I want to be reasonably certain the discrepancy isn’t coming from the shooter or some other input in the system.
This is where troubleshooting a ballistic system can become complicated, because there are a lot of variables capable of producing an error downrange. We aren’t going to chase all of those possibilities here. The important lesson for now is don’t use BC as the first knob you turn whenever the prediction and the target disagree.
There is a good reason many experienced instructors tell new shooters not to true BC at all. Done poorly, you can take a perfectly reasonable BC and turn it into a garbage number that simply makes the solver compensate for some other error in the system. If you’re new to this and something doesn’t make sense, this is also one of those times when having an experienced shooter beside you can be extremely valuable.
Only after I have confidence in the zero, velocity, group, and the other inputs we’ve established do I start becoming comfortable that the remaining vertical discrepancy may actually be telling me something about the BC.
As you shoot farther, there are also additional aerodynamic and environmental effects that can influence where a bullet lands. We aren’t going to get into those here because learning to separate those effects from normal dispersion, shooter error, wind, velocity variation, or a problem with the ballistic profile takes experience. This is also why I strongly prefer to do this work on a relatively calm day. We’re trying to determine whether our ballistic model agrees with what the rifle and bullet are actually doing, and strong or highly variable winds introduce another set of variables that can make that much harder to determine. You may not always be able to wait for a perfectly calm day, but I absolutely would not try to true a ballistic profile for the first time on a day when the wind is ripping. The important thing to understand is that an unexplained impact is not automatically evidence that something in your solver needs to be changed. Sometimes the best decision is to leave the profile alone until you have better information.
If we’re within a couple of tenths, I’m going to adjust the BC to match what I’m seeing on the target, but first I want to verify that observation with another group. This part of the process is very much like establishing a solid zero. There are no shortcuts here. If the first group is two-tenths high, dial the elevation correction down .2 mil and shoot another confirmation group.
If that confirmation group is now centered on waterline, look at the elevation you actually needed. Let’s say we’re shooting at 900 yards and the solver originally predicted 7.1 mils. Our first group centered .2 mil high, so we dialed down to 6.9 mils and shot another group. If that group centers on waterline, we now know the rifle actually needs about 6.9 mils at 900 yards.
Now go back into the ballistic solver and adjust the BC until the solver predicts that same 6.9-mil solution. If I’m using a G7 BC, I normally increase or decrease the value a few numbers at a time and watch what happens to the predicted elevation. It usually does not take a very large BC change to move the solution a couple of tenths at that distance.
This is why we’ve been so deliberate getting to this point. We established a zero we can trust, measured our velocity, built the ballistic profile from measured inputs wherever possible, checked it at 600 yards, and confirmed what we’re seeing at longer distance before changing anything. We aren’t changing the BC simply because one group landed a couple of tenths away from waterline. We’ve worked through the system and gathered enough evidence to have confidence that the drag model is actually the variable that needs to change.
Once the solver matches the firing solution we just verified on the target, shoot another group using the updated profile. That final group is what confirms that the BC adjustment actually brought the model in line with what the rifle is doing.
Validate the Entire Curve
Now it’s time to validate our entire curve and make sure our BC change worked at every distance. I would now check your waterline at distances from 300 yards all the way out to whatever target range you have available. This is the point where it gets pretty fun, too. If you’ve done your job well up to here, you’re starting to reap the rewards of a well-tuned system.
I’d start at 300 yards and send a couple of shots. Again, you should be very close to waterline. Now move out to 350 or 400 yards and check again. Then move to 500, and keep working your way out as far as you can, validating the entire time that your impacts are staying close to waterline. You don’t need to shoot groups at every distance at this point unless you see something that doesn’t make sense. I’m mostly validating that the system is doing what we expect it to do.
If something looks off, the simple answer is always: send another round!
If you do have an impact that’s either high or low, look at your chronograph data. Was that shot faster or slower than the average velocity in your solver? Could that account for what you’re seeing? Did you make a good trigger press? And it doesn’t cost you much to send another couple of rounds and see if the result repeats.
Again, the point is that if you’ve done a slow and deliberate job up to this point and been diligent about checking all of the inputs, we should be extremely close to waterline throughout the trajectory.
I also don’t consider the profile completely validated just because it worked on one range trip. I treat this much like establishing a zero. I want to see it work again on another day, and preferably under different atmospheric conditions. Then I may validate it again. Seeing the same profile continue to put bullets where the solver predicts gives me much more confidence that the adjustments I made were actually correct and weren’t simply compensating for something peculiar about the conditions on the day I made them.
Eventually, I also want to stop validating the profile only by shooting known-distance targets from a comfortable position. I want to start using it. For me, that often means shooting practice PRS stages where I’m engaging different targets at different distances and working under the same kinds of conditions where I’ll actually rely on the profile. Now I’m not simply asking whether the solver agrees with a target at a known distance. I’m finding out whether the entire system continues to work when I’m actually shooting.
Just like our zero, confidence in a ballistic profile comes from seeing it repeat.
If you want to put your system to work in a match, see Why Should I Shoot a Precision Rifle Competition?
The Foundation Is the Part That Lasts
Long-range shooting can become extraordinarily complex, but learning to shoot long range doesn’t have to begin that way. We’ve covered a lot of ground here, but the goal was never to teach you everything there is to know about long-range shooting. It was to give you a foundation you can build on. You need to begin by understanding the system well enough that you can tell what happened when you pulled the trigger.
That means knowing your zero is real, knowing what your ammunition is actually doing, and understanding the information you’re putting into the ballistic solver and why it matters. Then you need to test that prediction against what actually happens on the target instead of simply trusting the numbers on a screen. When something doesn’t agree, don’t immediately start changing things. Gather more information, figure out what the evidence is telling you, and make changes only when you have a reason to make them.
There is still an enormous amount to learn. Wind reading gets better with experience. So does recoil management, spotting impacts, building positions, and recognizing which variables matter in a particular situation. As you shoot more, you’ll encounter things we haven’t even discussed here. But you don’t need to understand all of those things before you begin.
The rifle may change. The cartridge may change. The bullet, weather, location, and distance may all change. The process of understanding what your system is doing doesn’t. You don’t need to begin by being a 1,000-yard shooter. You need to begin by understanding why the bullet went where it did. Once you can do that, distance becomes a lot less mysterious, and as your understanding grows, your limits will naturally move farther away.